Hi there sweet pea! Today I’m going to show y’all how I achieve this french twist rosette hairstyle!This is what I’m starting with, my hair is super straight and fine and thin and most of it is buzzed off so I don’t have a ton to work with.
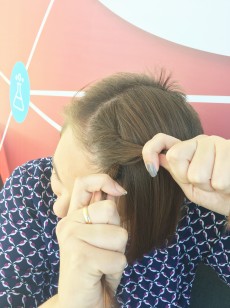
 Step 1: Split out a one inch section at the front of your hair and split that into two sections. Twist the two pieces around each other once or twice to start this style off.
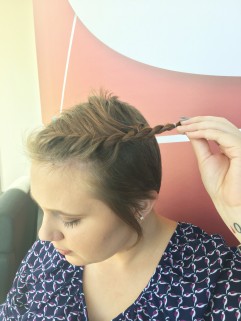
Step 2: You’re going to start adding hair into the front section (here‘s a video to show exactly what I’m talking about). Do this all the way through the section you’ve separated and finish off with either a rope braid (if you want to continue this twist style) or finish it off with a regular three strand braid. Tie the end of the braid with a hair tie and you should get something like this…
Step 3: Now this step is going to be dependent on how much hair you have; if your hair is longer you can just pin this braid under some hair and you’re good to go! If your hair is shorter like mine you can make a rosette of sorts out of your hair by curling the braid into a circle. It should look something like this….

And that’s all folks! This style is super simple and a great go to for lazy days when you still want to look cute!

I hope you enjoyed this post and if you have any more questions or requests definitely leave them down below!
–Keep it Posh

You look so beautiful! absolutely amazing
great post
c&s just posted https://cherriesnstrawberriesblog.wordpress.com/2016/10/01/makeup-revolution-beyond-flawless-eyeshadow-palette-review-and-swatches Can you take a look at my recent post. thank you
LikeLiked by 1 person
Thanks so much for the comment!
–Posh
LikeLike